Club Member Settings
If you have questions in this section or the Volunteer Settings please contact Erika Jeffries at erika@zingbooks.com
To view club member enrollment settings:
From menu on the left, click the orange 'Settings' button
Click on 'Enrollment Settings' icon (second from right)
Make sure orange button is clicked on 'Club Member Settings'
This part of the system is where State admins construct the enrollment forms that Club Members and Volunteers fill out. Components of the "enrollment packet" include:
- Enrollment Form
- Member information
- Contact information
- Emergency Contact information
- Race/Ethnicity questions
- Demographics questions
- School
- Military service question
- Waivers
- Health Form
- Privacy Release
- Publicity Release
- Code of Conduct
It is common for the waiver verbiage and content to have verbiage that is from your University and/or 4-H department. It is a very good idea to visit with your state 4-H program leader if your procedures/policy documents are edited on a regular interval. It is standard to review this information and get confirmation if there are changes to put those into place before rolling into a new 4-H Year. It is a good idea to review enrollment form questions as well to ensure that in that new 4-H year, the correct information is being captured on the enrollment form.
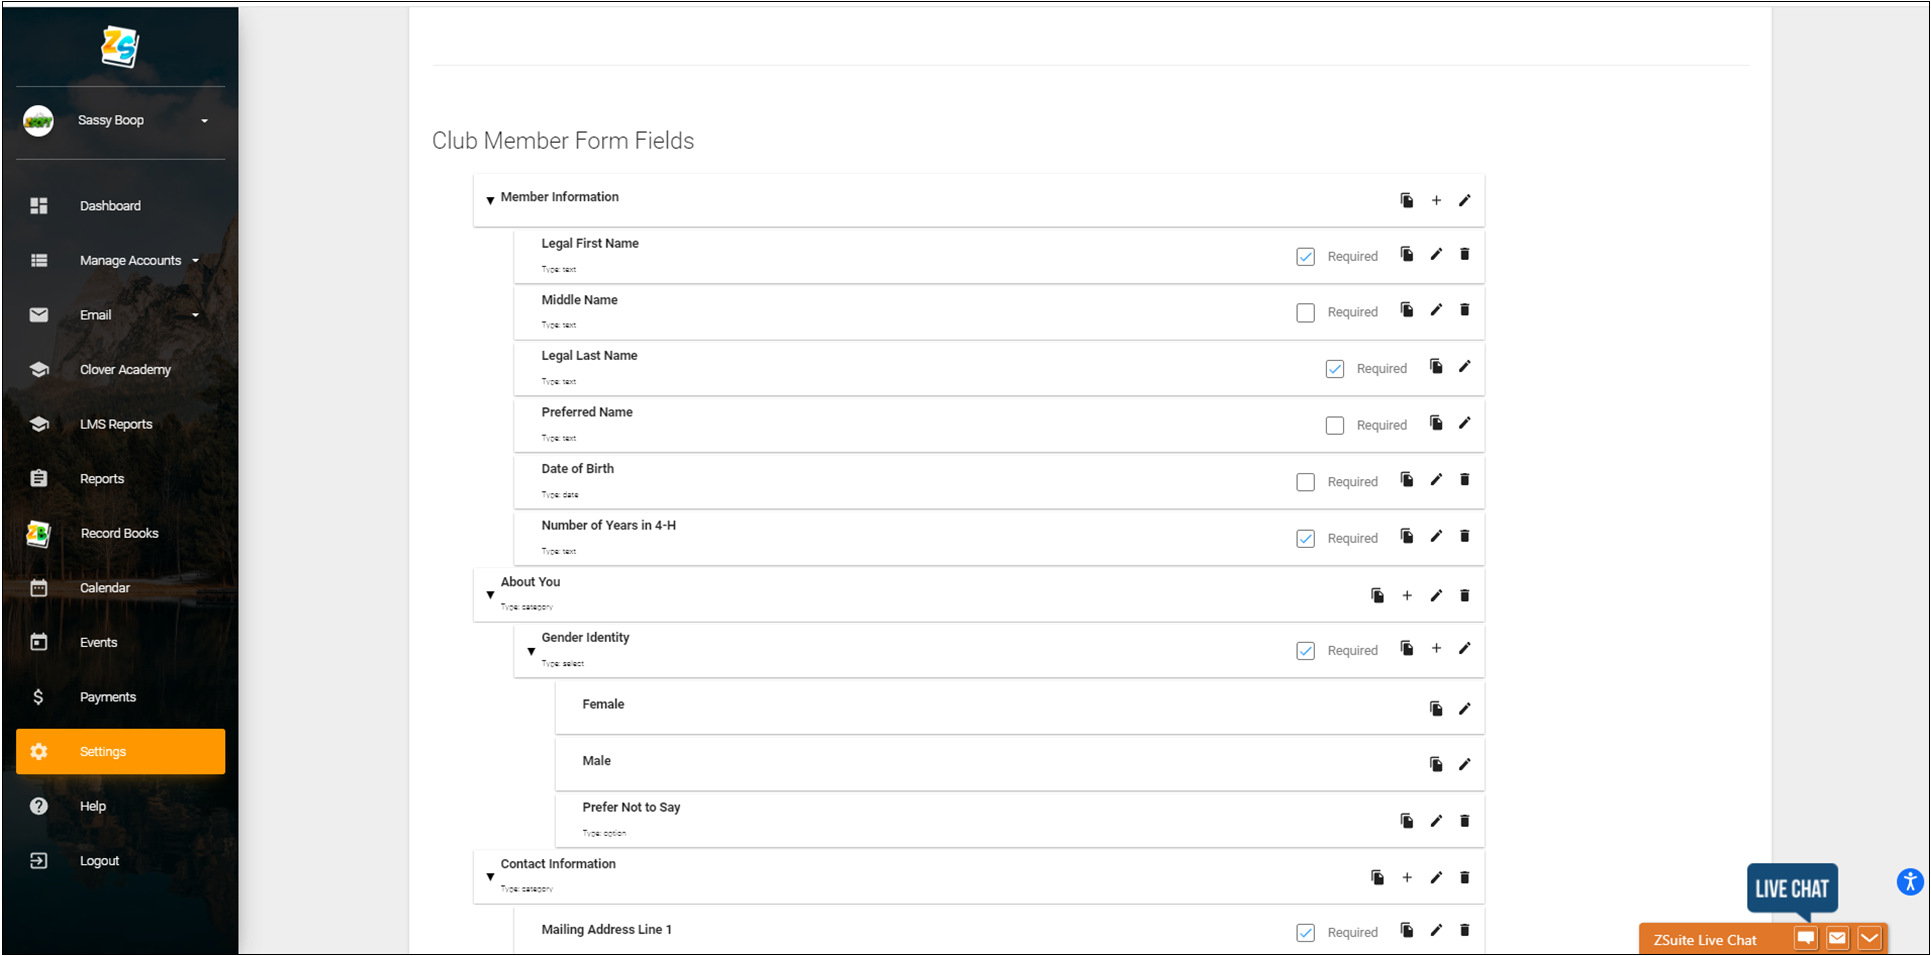
Club Member Form Fields
In the hierarchy of how the form is built think of category as the umbrella. The next steps include adding the questions that are to be housed under the umbrella. These items come together to make the enrollment form.
Category example - Member Information
Sub items -
- Legal First Name
- Middle Name
- Legal Last Name
- Preferred Name
- Date of Birth
- Number of years in 4-H
1. Click on the green 'CATEGORY' button to add a category. If you are starting a brand new form, the title of your new category would be Member Information (like example above)
2. Add a title for your category.
3. Click blue 'ADD' button
4. Click the '+' at the right to add a question.
There are two very important elements when it comes to the composition of your registration form. Your questions are dependent on the input type and validations.
Input Type
This section allows you to build your answer type. The dropdown menu has the following options:
- Text - This option provides a text placeholder for answers
- Single-Select - This option is for questions that are a single answer/ yes or no
- Multi-Select - This option is for questions that are check all that apply
- Date - Date response
- File - Adds a file upload option. Uploads can be .jpg or .pdf
Validations
Validations are answers that are validated on different responses. Not all questions require a validation.
The dropdown menu has the following options:
- None
- Numeric
- Date
- Phone Number
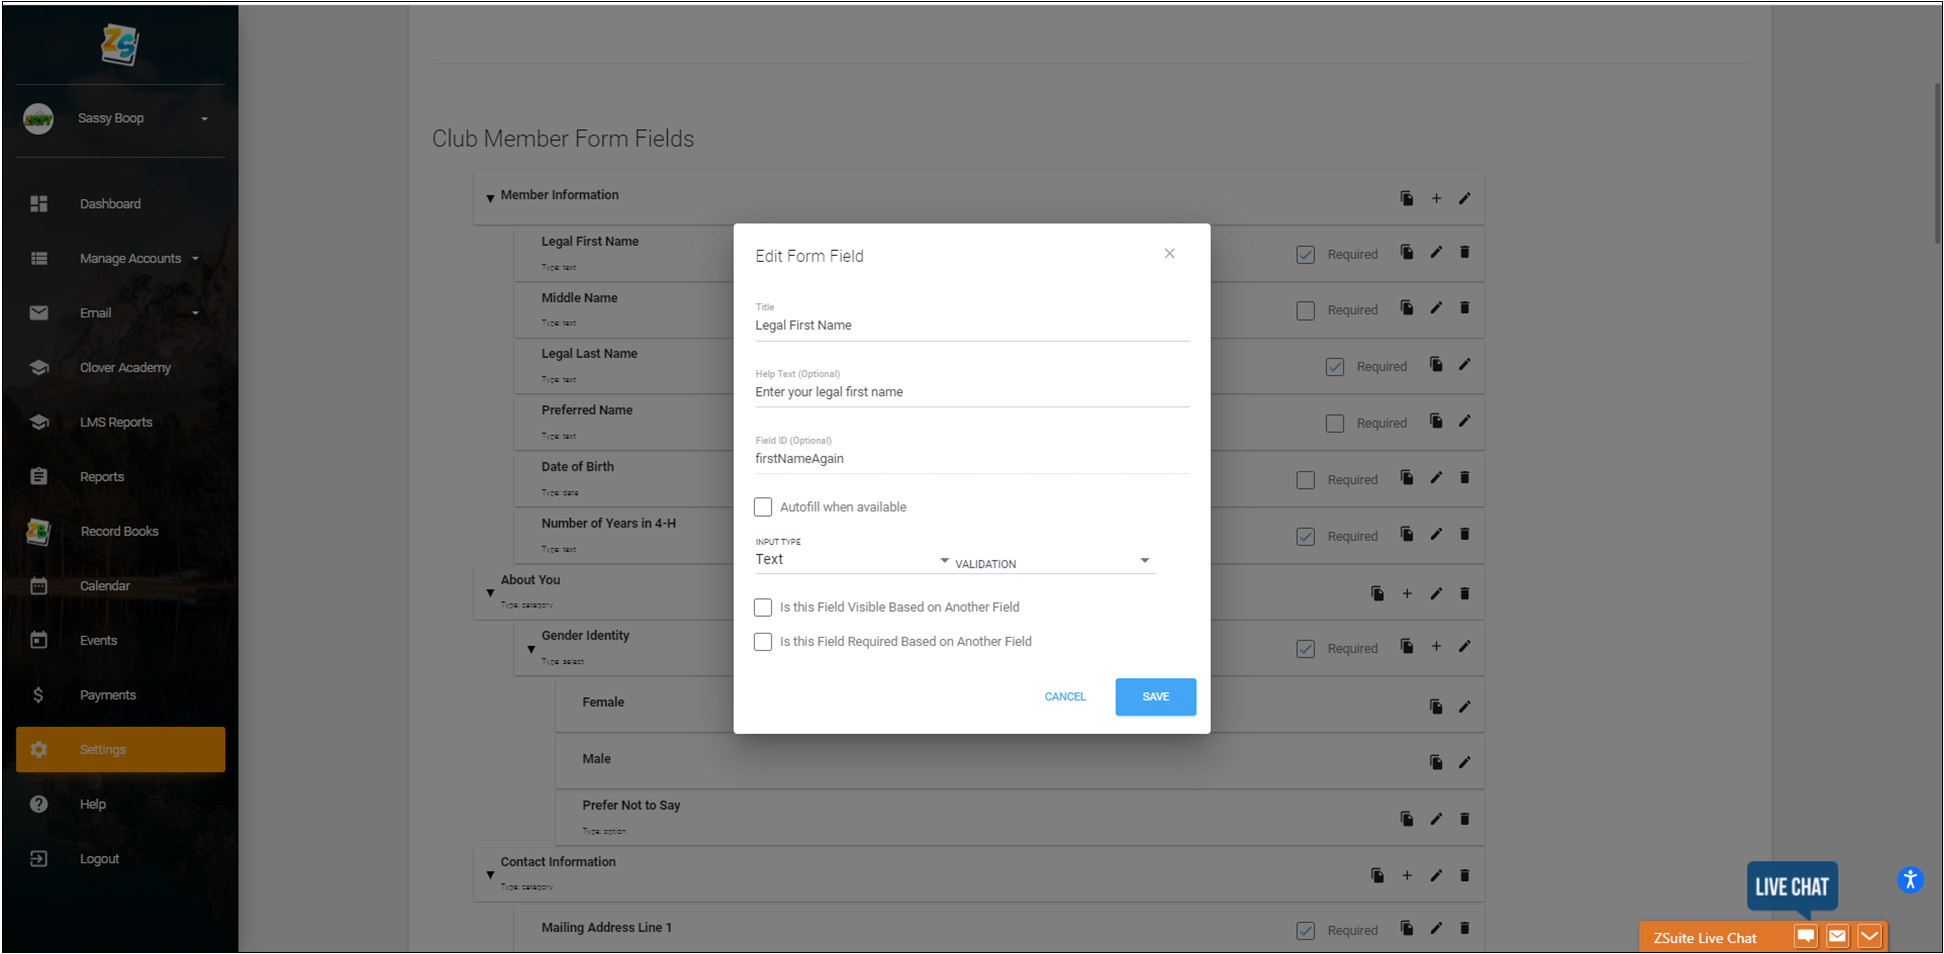
5. For this first question the title will be Legal First Name (if building form from scratch).
6. Add 'Help' text to display, provides a prompt when the form is being filled out.
7. Input Type = Text (the respondent is filling in their name) Validation = None.
8. Click blue 'SAVE' button.
9. Click '+' at the right of the Member Information category to add your second question, which is Middle Name.
10. Repeat steps 5-8 to complete the Middle Name question and add the following questions:
- Legal Last Name
- Preferred Name
- Date of Birth (input type = Date and Validation = Date)
- Number of Years in 4-H
11. Review questions add a check mark to the questions that are required (see image #1 as an example).
12. Click green 'ADD CATEGORY' to add new category.
13. Title new category About You.
14. Click blue 'ADD' button.
15. Click '+' sign to the right on the About You Category to add a question.
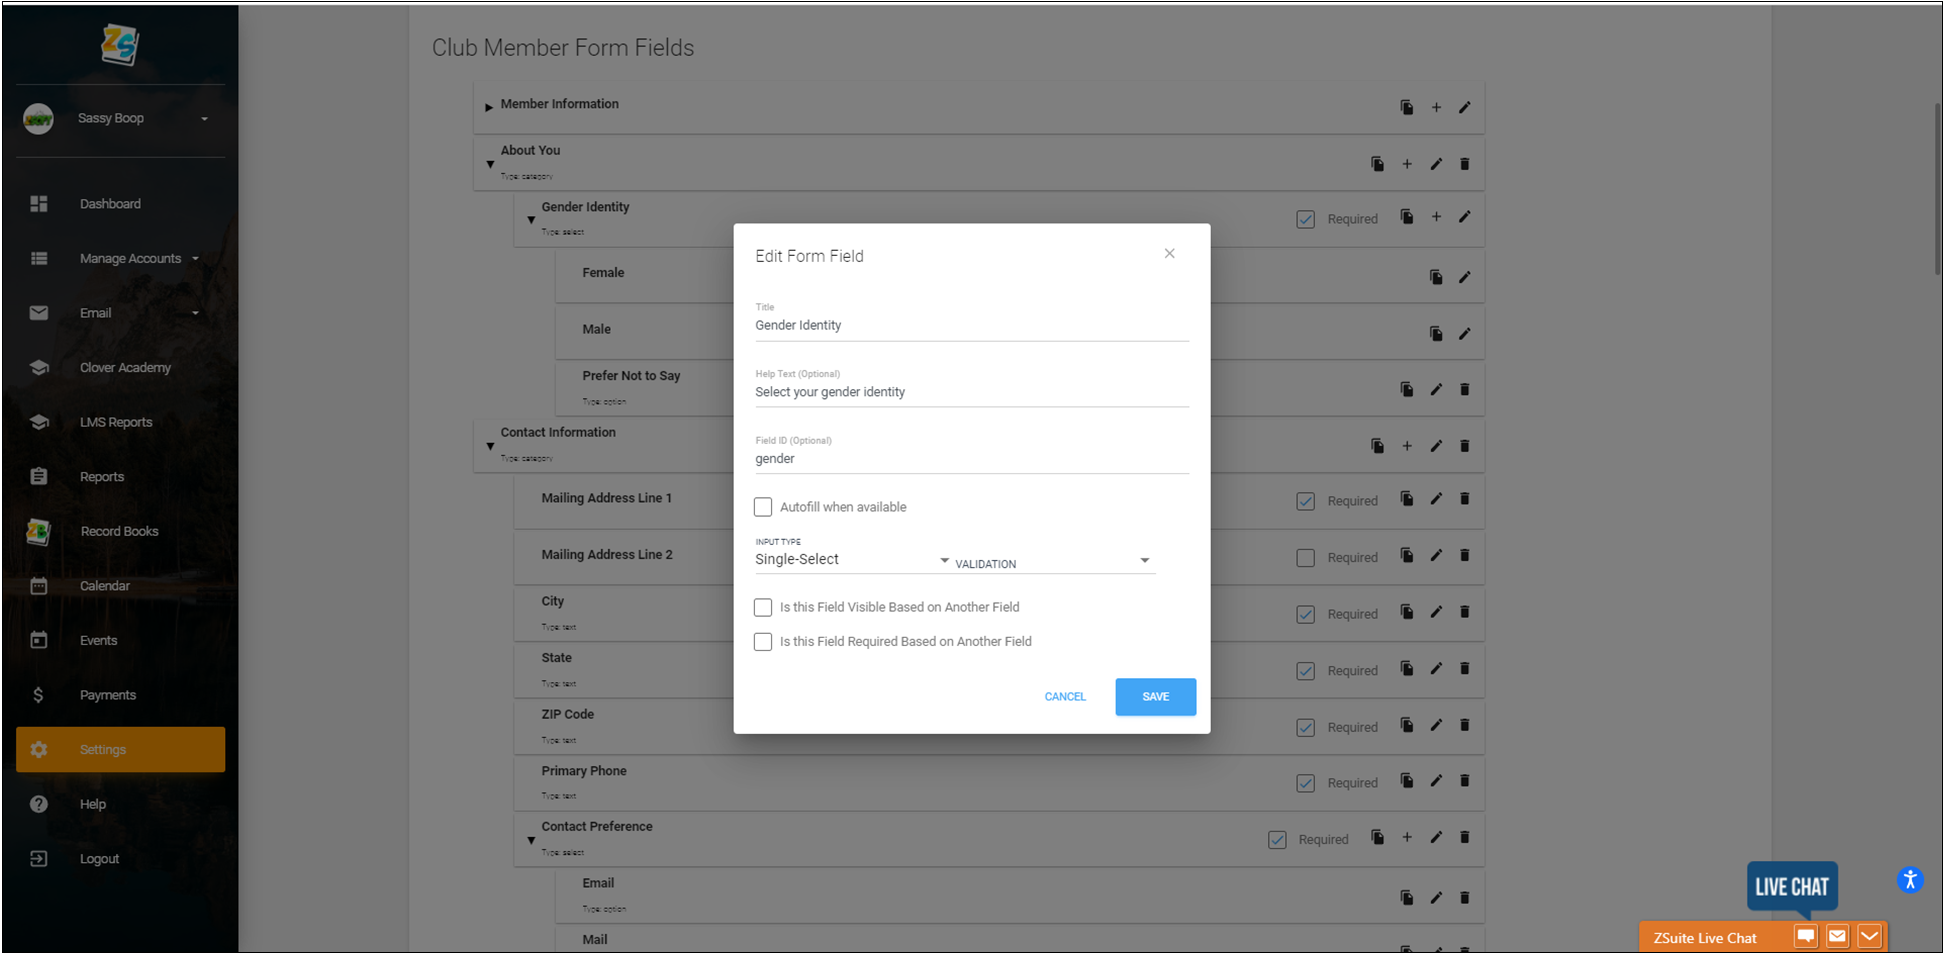
16. Enter in the title of your question. If building your form from scratch, the title for this question is Gender Identity.
17. Add Help Text - Select your genter identity
18. Input Type = Single-Select. Validation = None
19. Click blue 'SAVE' button
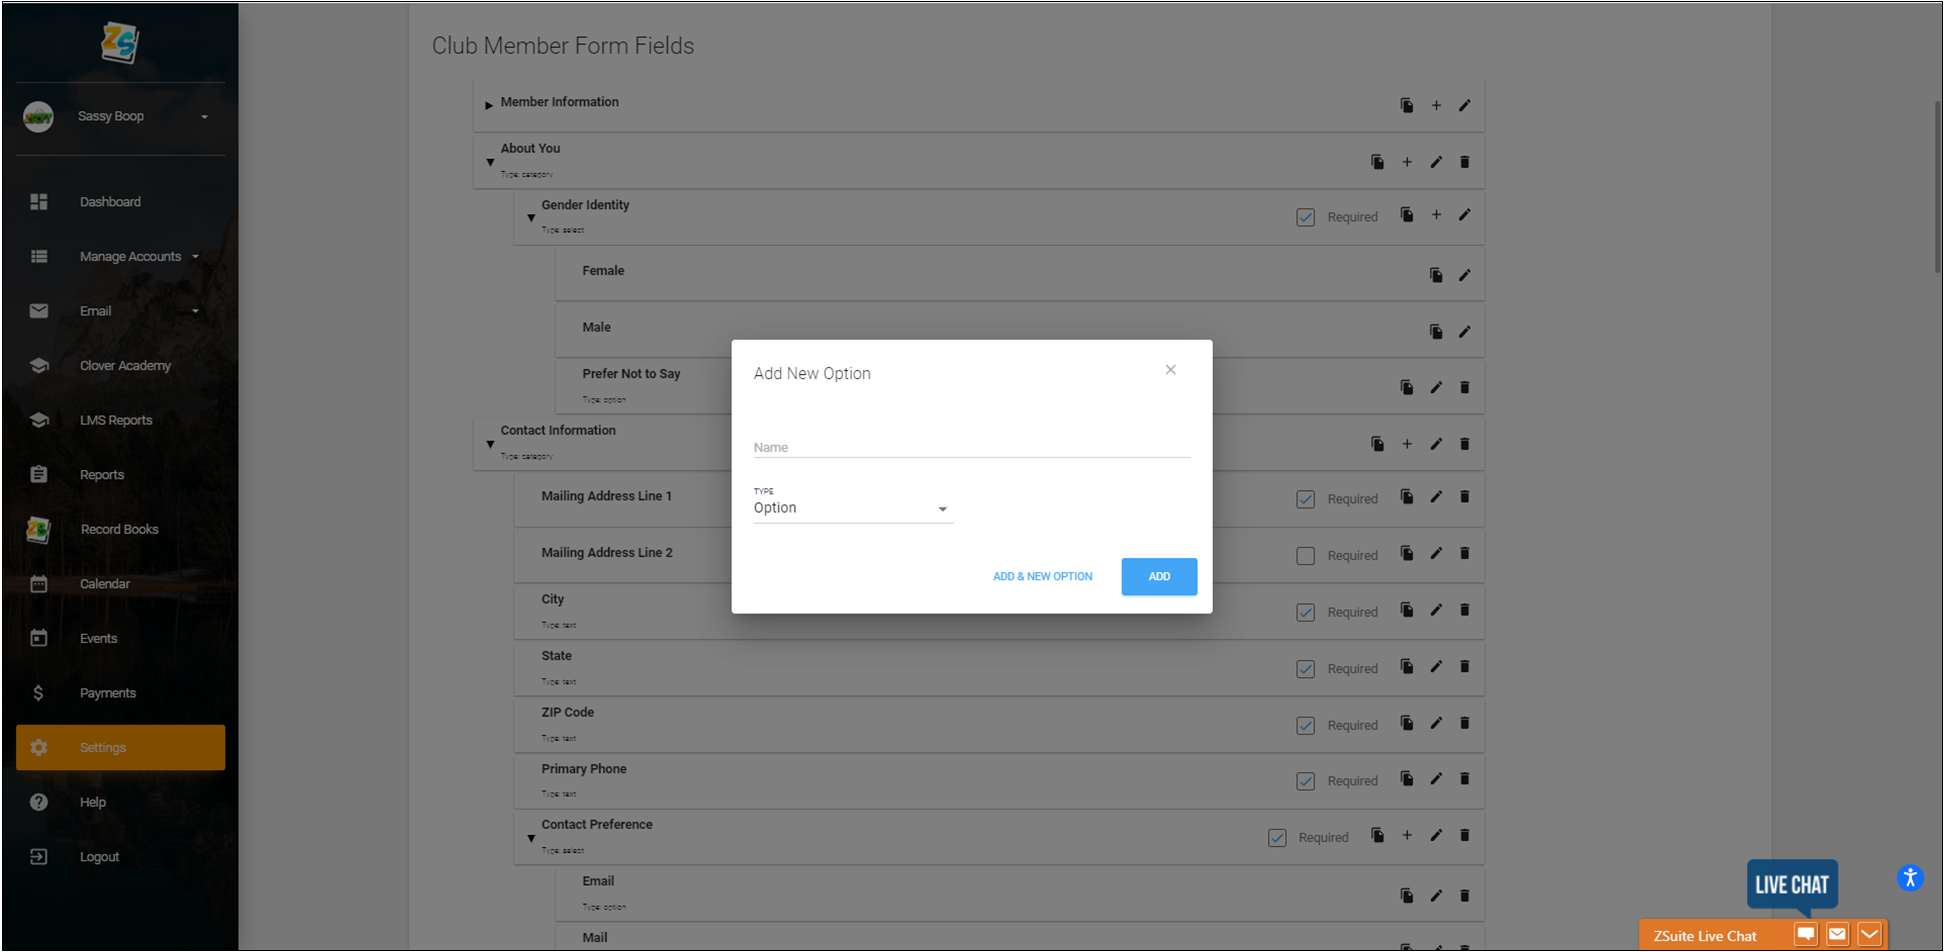
20. Click the '+' sign on the Gender Identity category to add answer options.
21. A new window will pop up (see example below). Name = Female, Type = Option.
22. Click blue 'Add' button.
23. Repeat steps 20-22 to add the Male option.
24. Repeat steps 20-22 to add the Prefer Not to Say option.
25. Check the required box on the right of the Gender Identity Category
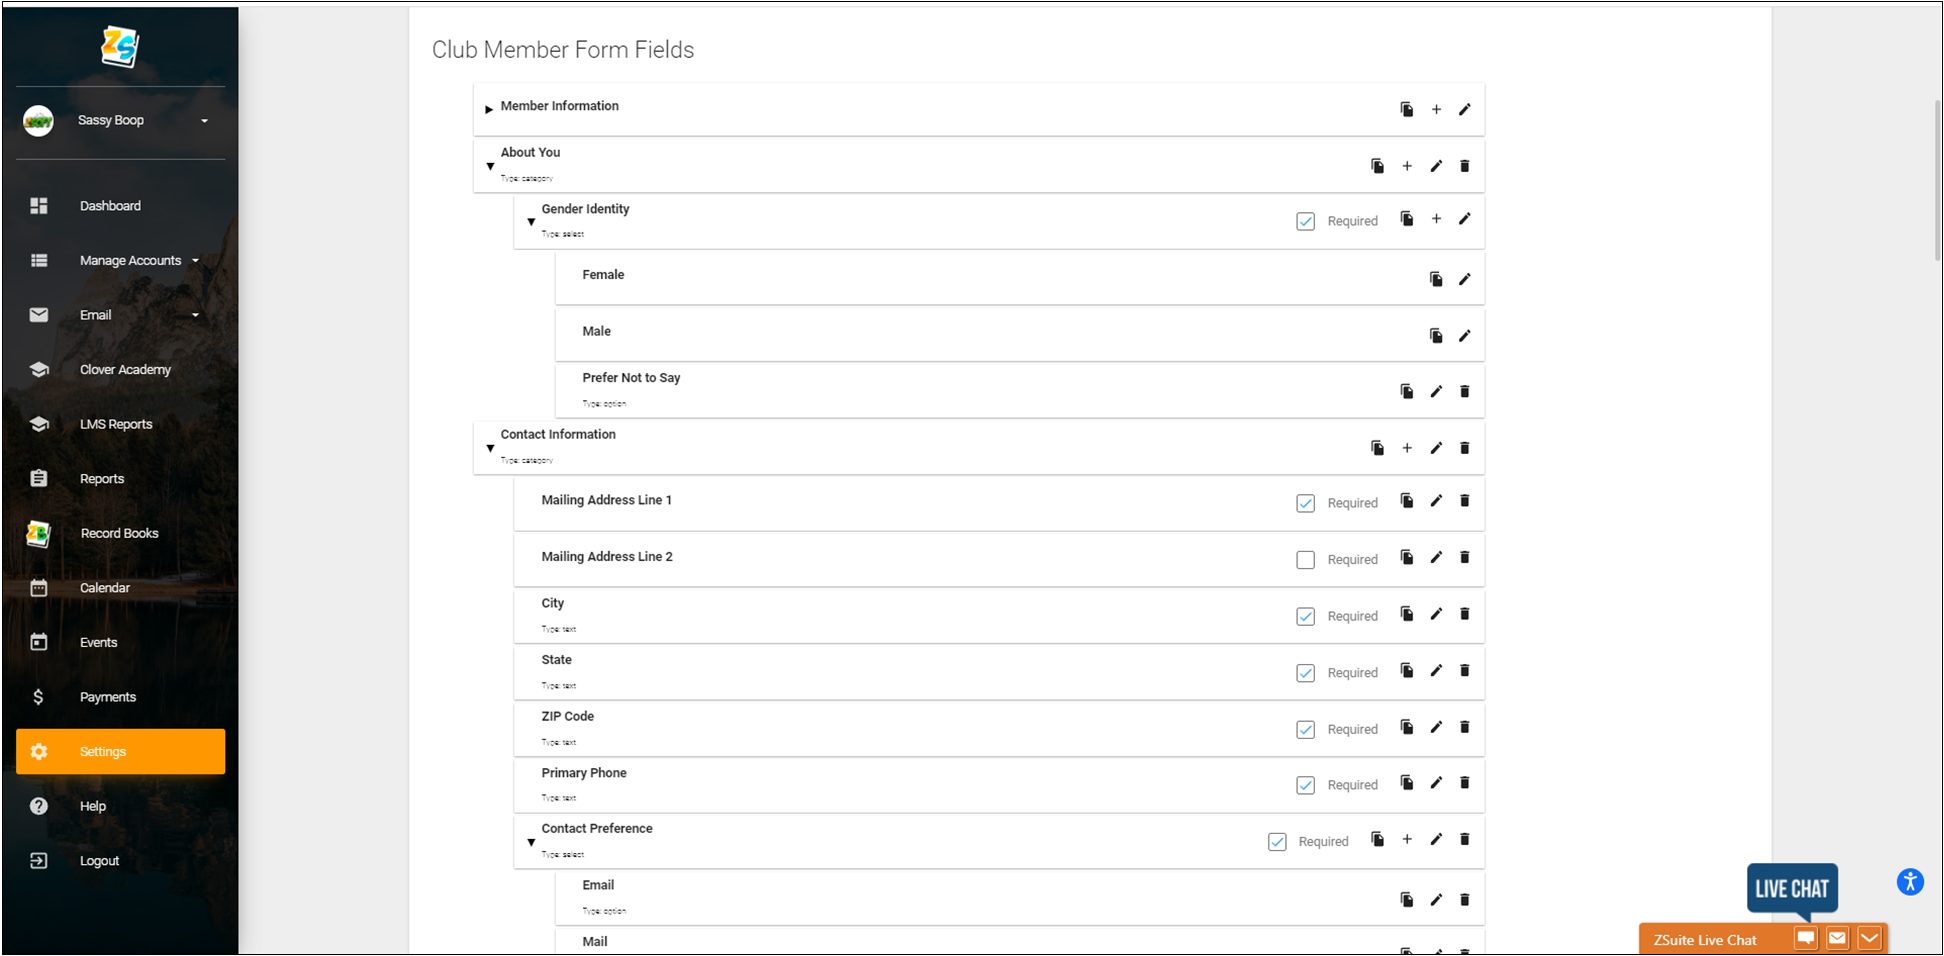
Refer to the upper sections of this document as you work through the rest of the enrollment form. An example of how this form looks is below.
26. Click green 'ADD CATEGORY' to add new category.
27. Title = Contact Information
28. Click '+' sign on the Contact Information category to add the following questions:
- Mailing Address 1 (input type = text, no validation)
- Mailing Address 2 (input type = text, no validation)
- City (input type = text, no validation)
- State (input type = text, no validation)
- Zip Code (input type = text, no validation)
- Primary Phone (input type = text, validation = Phone Number)
29. Click '+' sign on the Contact Information category to add the Contact Preference field Input type = Single Select, no validation)
30. Click '+' sign on the Contract Preference field to add the following options:
- Text Message
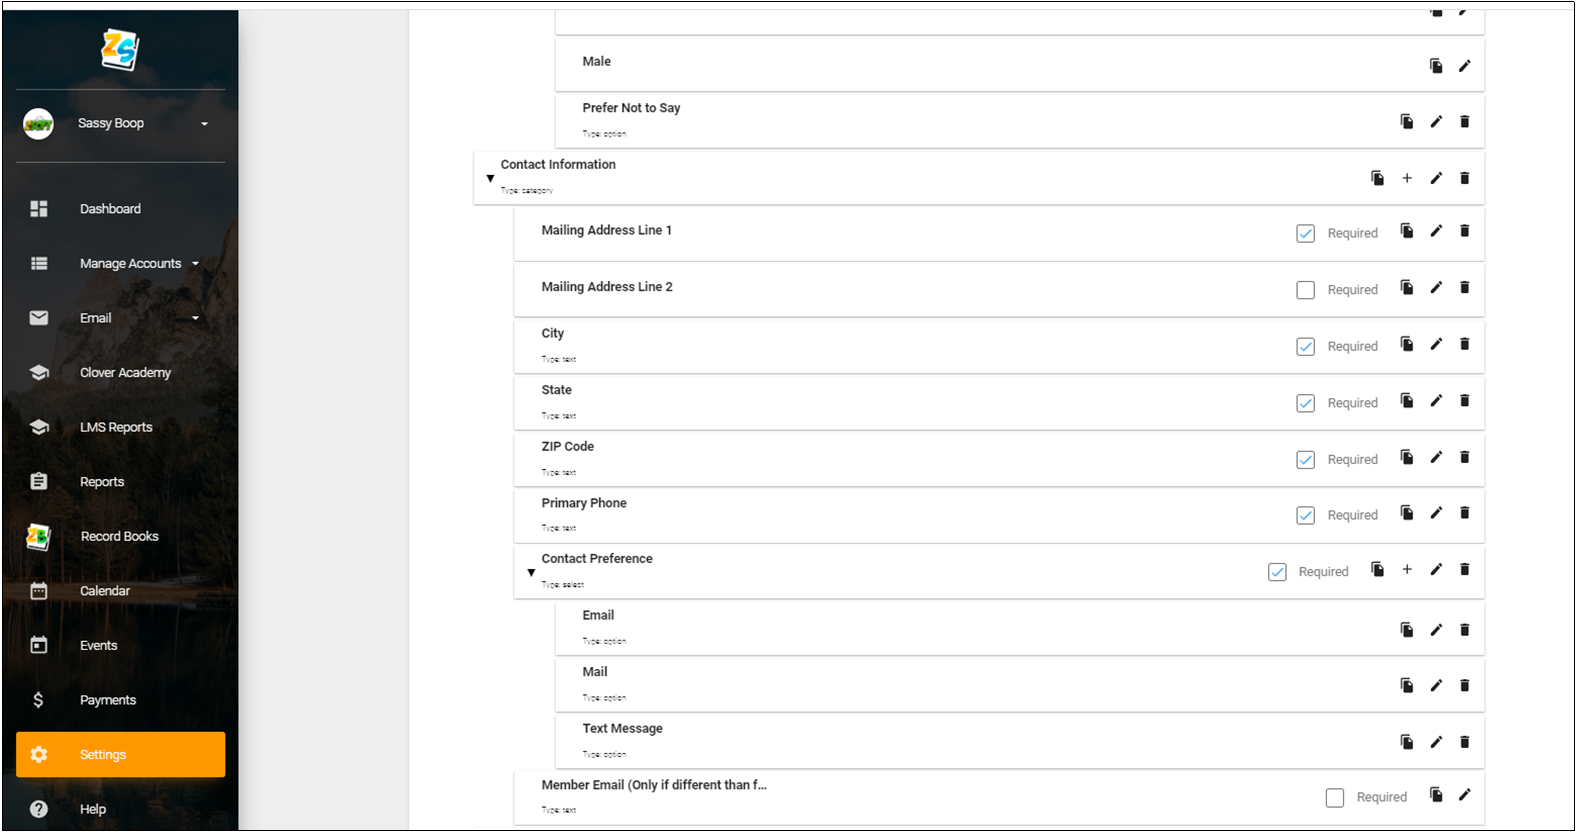
31. Click '+' sign on the Contact Information category to add the Member Email (Only if different than family email) field
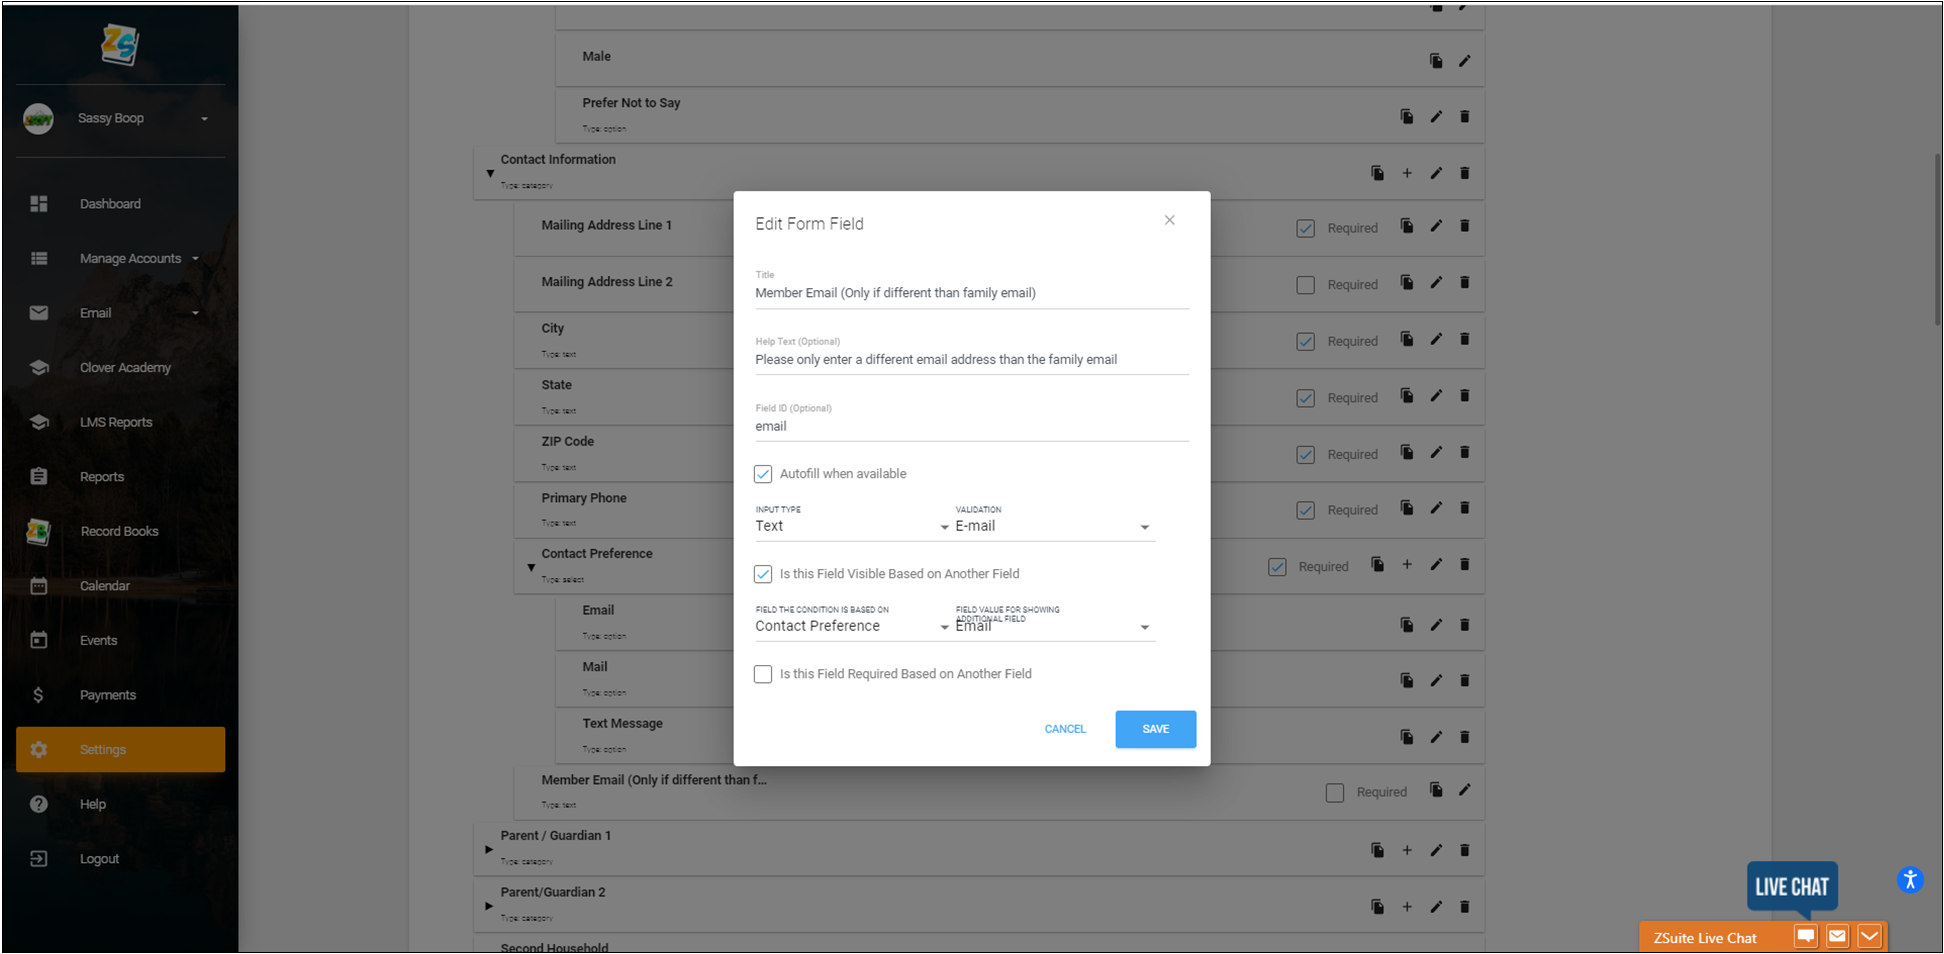
32. Help text = Please only enter a different email address than the family email
33. Check the 'Autofill when available' box
34. Input Type = Text, Validation = Email
35. Check the 'Is this Field Visible Based on Another Field' box
36. Condition Field = Contact Preference Field Value = Email
37. Click blue 'SAVE' button
38. Check the following boxes to make these questions required:
- Mailing Address 1
- City
- State
- Zip
- Primary Phone
- Contact Preference
39. Add the remaining Categories and corresponding questions. Add Category = Parent/Guardian 1
- First Name (Input Type = Text, no validation)
- Last Name (Input Type = Text, no validation)
- Phone Number (Input Type = Text, Validation = Phone Number)
- Work Number (Input Type = Text, Validation = Phone Number)
- To receive text messages, enter cell phone number
- Help Text = Please enter a cell phone number to receive text messages
- Input Type = Text, Validation = Phone Number
- Check the 'Is This Field Visible Based On Another Field' box
- Field Condition = Contact Preference, Field Value = Text Message
- Check the 'Is This Field Required Based On Another Field' box
- Field Condition = Contact Preference, Field Value = Text Message
- Add a check mark to the First Name, Last Name, Phone Number to make those questions required
40. Add Category = Parent/Guardian 2
- Do you have a second parent / guarding that you'd like to provide information for? (Input Type = Single Select, no validation)
- No
- Yes
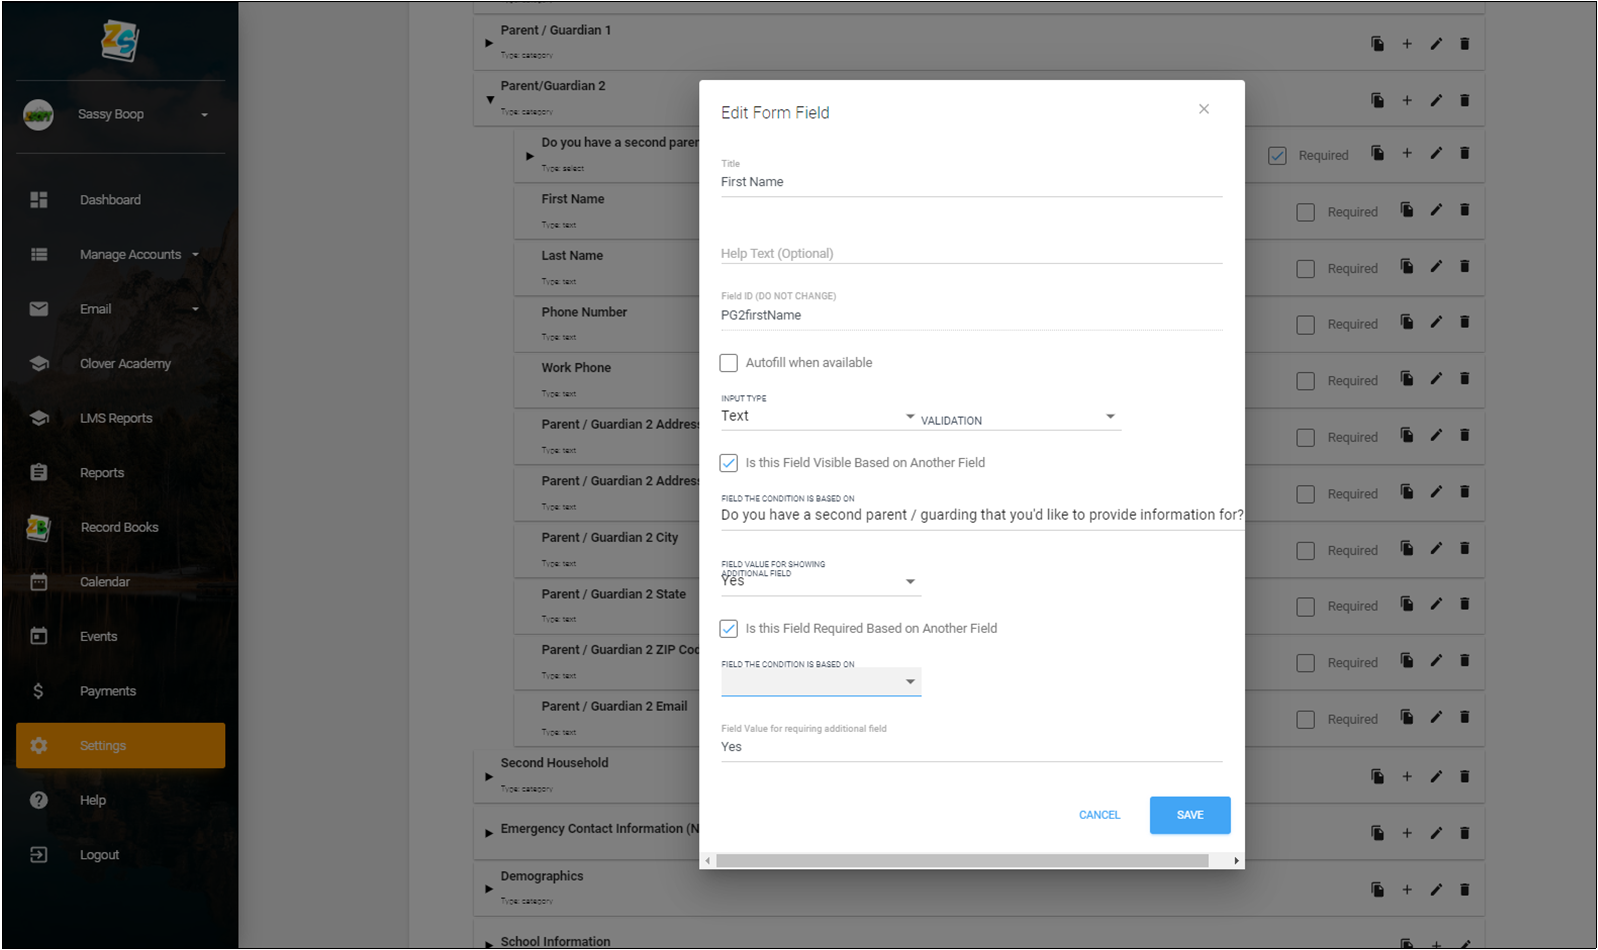
41. Click '+' sign on the 'Do you have a second parent...' category
- Title = First Name
- Check the box 'Is this Field Visible Based on Another Field
- Field condition based on = Do you have a second parent/guardian that you'd like to provide information for?
- Field Value For Showing Additional Field = Yes
- Check the box 'Is this Field Required Based on Another Field"
- Field Value for requiring additional field = Yes
42. Repeat step 41 and sub parameters to add the following fields
- Last Name
- Input type = Text
- Check the box 'Is this Field Visible Based on Another Field'
- Field Condition is based on = Do you have a second parent/guardian that you'd like to provide information for?
- Field Value for Showing Additional Field = select yes from dropdown
- Field Value for requiring additional field = Yes
- Phone Number
- Work Number
- Parent/Guardian 2 Address
- Parent/Guardian 2 Address 2
- Parent/Guardian City
- Parent/Guardian State
- Parent/Guardian Zip Code
- Parent/Guardian Email
43. Add Category = Second Household
- Click '+' sign on the Second Household category to add the Would you like to provide information for a second household? Field. Input type = Single Select, no validation)
- Once created check the box to make the question required
- Click on the '+' sign on the field to add Yes and No answer options
44. Click '+' sign on the Second Household category to add the following fields:
- First Name
- Input Type = Text
- Check the box 'Is this Field Visible Based on Another Field
- Field Condition = Would you like to provide information for a second household?
- Field Value for Showing Additional Field = Yes
- Last Name (repeat the parameters used for First Name for this and remaining fields)
- Phone
- Relationship
- Address
- Address 2
- City
- State
- Zip Code
45. Click green 'ADD CATEGORY' Name = Emergency Contact Information (Not already listed)
46. Click '+' sign on Emergency Contact Information (Not already Listed) to add the following fields
- Emergency Contact Name (Input type = Text, No validation)
- Emergency Contact Phone Number (Input type = Text, Validation = Phone Number)
- Emergency Contact Relationship (Input type = Text, No validation)
- Emergency Contact Email (Input type = Text, Validation = Email)
47. Check the following boxes to make these fields required
- Emergency Contact Name
- Emergency Contact Phone Number
- Emergency Contact Relationship
48. Click green 'ADD CATEGORY' Name = Demographics
49. Click '+' sign on Demographics Category to add a new field = Place of Residence. Input type = Single Select
50. Add the following options for Place of Residence:
- Farm
- Town Under 10,000 or Rural Non-Farm
- Town, City or Suburbs 10,000 to 50,000
- City - Central, more than 50,000
51. Check the box to make Place of Residence a required question
52. Click '+' sign on Demographics Category to add a new field = Are you of Hispanic, Latino/a/x, or of Spanish origin? Input type = Single Select
53. Add the following options:
- No, not of Hispanic, Latino/a/x, or Spanish origin
- Yes, of Hispanic, Latino/a/x, or Spanish origin
54. Check the box to make Are you of Hispanic, Latino/a/x, or Spanish origin a required question.
55. Click '+' sign on Demographics Category to add a new field = Race (Choose all that apply). Input type = Multi-Select
56. Add the following options:
- American Indian or Alaskan Native
- Asian
- Black or African American
- Native Hawaiian or other Pacific Islander
- White
- Prefer Not to State
- Prefer to Self-Describe
57. Click '+' on Race Category to add new Field = Self-Describe as:
- Input type = Text
- No validation
- Check the box 'Is this Field Visible Based on Another Field'
- Field Condition = Race (choose all that apply)
- Field Value = Prefer to Self-Describe
58. Click green 'ADD CATEGORY' Name = School Information
59. Click '+' on School Information Category to add the following Field = School Type. Input type = Single-Select
60. Add the following options:
- Public
- Private
- Charter
- Home
61. Click '+' on School Information Category to add the following Field = School County. Input type = Text, No validation.
62. Click '+' on School Information Category to add the following Field = School District. Input type = Text, No validation.
63. Click '+' on School Information Category to add the following Field = School Name. Input type = Text, No validation.
64. Click '+' on School Information Category to add the following Field = Grade. Input type = Single-Select, no validation.
65. Add the following Grade options:
- Kindergarten
- 1st
- 2nd
- 3rd
- 4th
- 5th
- 6th
- 7th
- 8th
- 9th
- 10th
- 11th
- 12th
- Post HS
- Not in School
66. Check the boxes to make sure the following questions are required within the School Information category:
- School Type
- School County
- School District
- School Name
- Grade
67.Click green 'ADD CATEGORY' Name = Military Service of Family
68. Click '+' on Military Service of Family Category to add a new Field = Military Service. Input Type = Single-Select, No Validation
69. Add answer options:
- No one in my family is serving in the military
- I have a family member who served in the military
70. Click '+' on Military Service of Family Category to add a new Field = Branch of Service.
- Input type = Single Select. No validation
- Check 'Is this Field Visible Based on Another field'
- Field Condition = Military Service
- Field Value = I have a member who served in the military
- Check 'Is this Field Required Based on Another Field
- Field Condition = Military Service
- Field Value = I have a member who served in the military
71. Add answer options;
- Army
- Air Force
- Coast Guard
- Navy
- Marine Corps
- Space Force
72. Click '+' on Military Service of Family Category to add a new Field = Branch Component.
- Input type = Single Select. No validation
- Check 'Is this Field Visible Based on Another field'
- Field Condition = Military Service
- Field Value = I have a member who served in the military
- Check 'Is this Field Required Based on Another Field
- Field Condition = Military Service
- Field Value = I have a member who served in the military
73. Check the box to make the Military Service question required.
74. Click on the eye icon entitled 'Preview Form' to review, check for spelling and grammar errors.
Created with the Personal Edition of HelpNDoc: Easily create EPub books